Hello world in Scheme for Android
(This is an update of the 2009 version, which was an update of the original 2008 version.)
Google's phone operating system "Android" is based on a custom Java virtual machine on top of GNU/Linux. So it occurred to me: How difficult would it be to get a Kawa application running on Android? Not that difficult, it turns out.
Here is "Hello world" written in Kawa Scheme:
(require 'android-defs)
(activity hello
  (on-create-view
   (android.widget.TextView (this)
    text: "Hello, Android from Kawa Scheme!")))
(A more interesting
text-to-speech example app is on
Santosh Rajan's Android-Scheme blog.)
The following instructions have been tested on GNU/Linux, specifically Fedora 13, but if you've managed to build Android applications under (say) Windows, you should be able to appropriately modify these instructions.
Getting and building Kawa and Android
First download the Android SDK. Unzip in a suitable location,
which we'll refer to as ANDROID_HOME.
$ export ANDROID_HOME=/path/to/android-sdk-linux_86
$ PATH=$ANDROID_HOME/tools:$PATH
Next you have to get the appropriate platform SDK:
$ android update sdkSelect
SDK Platform Android 2.2 or whatever
and click Install.
You need to select an Android platform
.
Platform 8 corresponds to Android 2.2 (Froyo).
ANDROID_PLATFORM=android-8
You need to get the Kawa source code (version 1.11 or later).
Set JAVA_HOME to where your JDK tree is, for example:
$ export JAVA_HOME=/opt/jdk/1.6.0
If using Ant (as is recommended on Windows):
$ ant -Denable-android=true
Alternatively, you can use configure and make:
$ KAWA_DIR=path_to_Kawa_sources
$ cd $KAWA_DIR
$ ./configure --with-android=$ANDROID_HOME/platforms/$ANDROID_PLATFORM/android.jar --disable-xquery --disable-jemacs
$ make
Creating the application
Next, we need to create a project or activity
,
in the target directory KawaHello,
with the main activity being a class named hello
in a package kawa.android:
$ android create project --target $ANDROID_PLATFORM --name KawaHello --activity hello --path ./KawaHello --package kawa.android
Replace the skeleton hello.java by the
Scheme code at the top of this note:
$ cd KawaHello
$ HELLO_APP_DIR=`pwd`
$ cd $HELLO_APP_DIR/src/kawa/android/
$ rm hello.java
$ emacs hello.scm
We need to copy/link the Kawa jar file so the Android SDK can find it:
$ cd $HELLO_APP_DIR
$ ln -s $KAWA_DIR/kawa-1.10.jar libs/kawa.jar
Optionally, you can use kawart-1.10.jar, which is
slightly smaller, but does not support eval,
and does not get built by the Ant build:
$ ln -s $KAWA_DIR/kawart-1.10.jar libs/kawa.jar
We also need to modify the Ant build.xml
so it knows how to compile Scheme code:
$ patch < build-xml-patch.txt
Finally, we can build our application:
$ ant debug
Running the application on the Android emulator
First you need to
create an Android Virtual Device (avd).
Start:
androidthen select
Virtual Devices, then click New....
Pick a Name (we use avd8 in the following),
a Target (to match $ANDROID_PLATFORM),
and optionally change the other properties, before clicking Create AVD.
Start up the Android emulator:
$ emulator -avd avd8 &
Wait until Android has finished booting (you will see the Android home screen), click the menu and home buttons. Now install our new application:
adb install bin/KawaHello-debug.apk
The new hello application should show up.
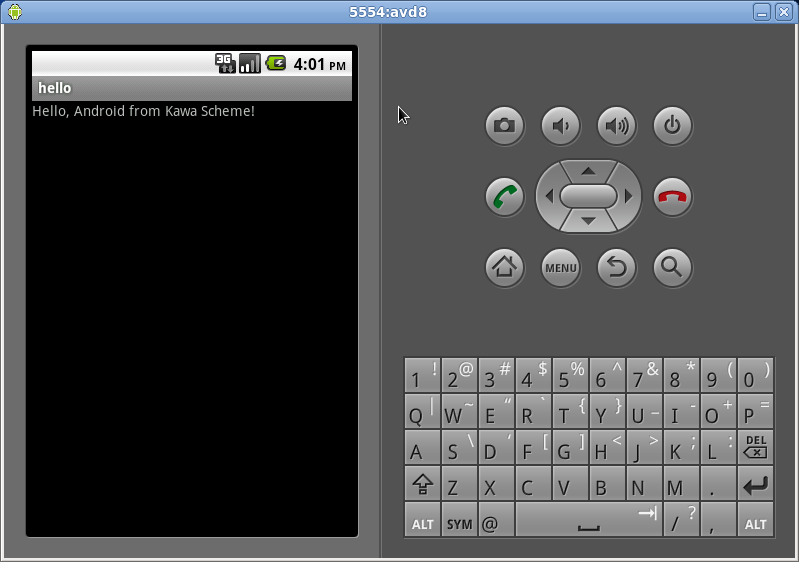
Click it, and you should see something like:
Running the application on your phone
If the emulator is running, kill it:
$ kill %emulator
On the phone, enable USB debugging. (This is settable from the
Settings application, under Applications / Development.)
Connect the phone to your computer with the USB cable.
Verify that the phone is accessible to adb:
$ adb devices
List of devices attached
0A3A560F0C015024	device
If you don't see a device listed, it may be permission problem. You can figure out which device corresponds to the phone by doing:
$ ls -l /dev/bus/usb/*
/dev/bus/usb/001:
total 0
...
crw-rw-rw- 1 root wheel 189, 5 2010-10-18 16:52 006
...
The timestamp corresponds to when you connected the phone. Make it readable:
$ sudo chmod a+w /dev/bus/usb/001/006
Obviously if you spend time developing for an Androd phone you'll want to automate this process; this link or this link may be helpful.
Anyway, once adb can talk to the phone, you
install in the same way as before:
adb install bin/KawaHello-debug.apk
Some debugging notes
You will find a copy of the SDK documentation in
$ANDROID_HOME/docs/index.html.
If the emulator complains that your application
has stopped unexpectedly
, do:
$ adb logcat
This shows log messages, stack traces, output from the Log.i
logging method, and other useful information.
(You can alternatively start ddms
(Dalvik Debug Monitor Service), click on the kawa.android
line in the top-left sub-window to select it, then from the
Device menu select Run logcat....)
To uninstall your application, do:
$ adb uninstall kawa.android