Per's blog
Shell integration
refers to a protocol
between a terminal emulator and a shell (or other REPL)
to provide various features, some shown below.
The main idea is that the shell sends extra escape sequences to mark
the various parts of a command: prompt, input, and output.
Terminals that have supported some variation of this concept include
XMLterm,
GraphTerm,
FinalTerm,
Iterm2,
ExtraTerm, and
DomTerm.
These protocols are not consistent and have missing funtionality,
so I have been working on
a proposed specification.
The rest of this article will show some of the supported features,
and discuss some unresolved issues.
If you want to try out the current state, please
clone DomTerm,
and follow the
build instructions.
Best results (and the following screenshots) use the current
gitgub master of Fish,
after sourcing tools/shell-integration.fish
(in the DomTerm sources).
Visually separate commands from each other
Shell integration enables each command (with its associated input and output)
to be separated from other commands.
The default DomTerm styling uses a thin partially-transparent green line
you can see in the screenshot below
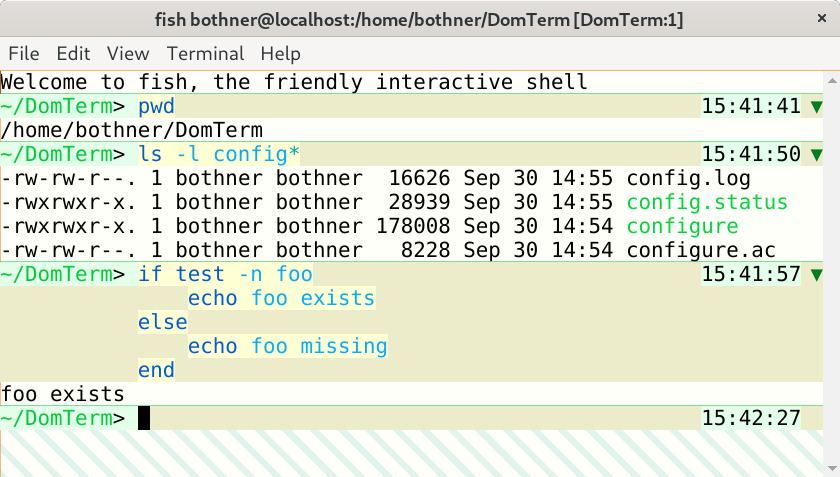
Different styling for prompt, input, and output
It is helpful to use a different styling for input and output. A simple version is to add distinctive styling for the prompt, but adding styling for entire input lines is even better. The DomTerm default styling (for light mode) is a pale green background for the prompt, a light yellow for the actual input, and a slighly darker yellow for the rest of the input line. Using pale background colors makes it less likely that it will conflict with user color preferences, including syntax coloring.

Note that the actual user input are distictively styled,
even spaces. It is helpful to see what are the actual input characters,
to avoid surprises in selection or cursor movement.
The above echo -n foo \ illustrates this -
the input line ends with two spaces:
The final space is removed by the fish parser, but the space before
is escaped by a backslash, as you can see in the output.
(The down-arrow ⏎ symbol is emitted by fish to indicate
a missing final newline in the output. The output ends in two spaces: one
following foo in the input and one following the backspash.)
Button to hide/show command output
One useful feature enabled by shell integration
is a button to hide (or show) the output of a command.
DomTerm puts a downward triangle in the right gutter
of the first
line if there is any output or more than one input line.
Clicking on the button hides all but the first line, and changes
the triangle to a right-pointing one
(that can be clicked to restore the hidden lines).
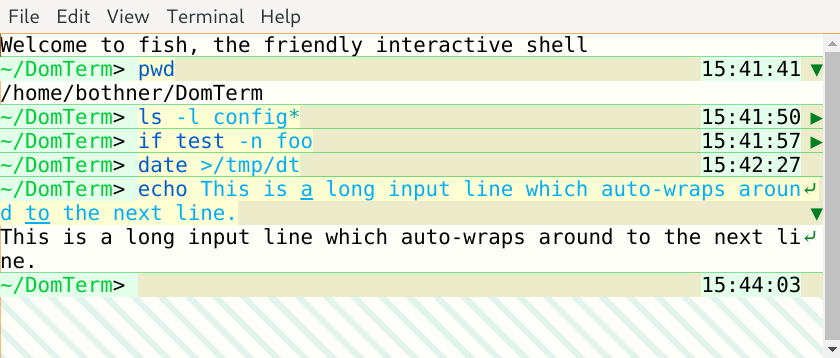
DomTerm places the hide/show button in the same right gutter
that is also used to mark wrapped long lines (as shown above).
The same area is also used to show error status (below),
and for the cursor when at the end of a line.
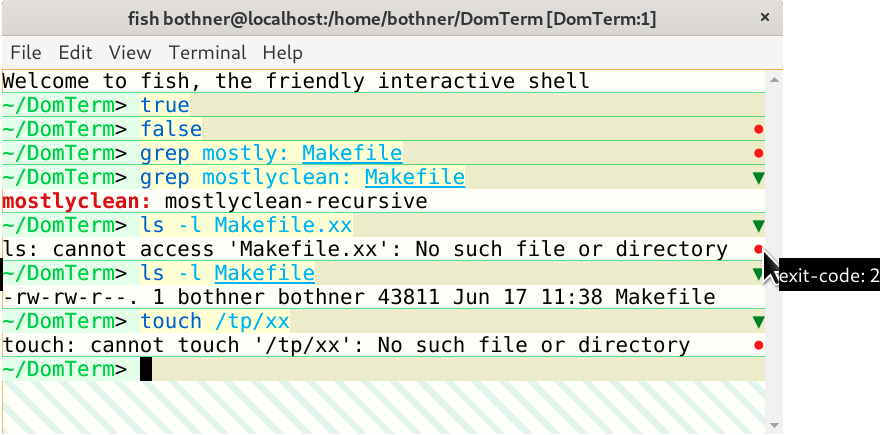
Show error status
When a command finishes, the application can send the exit status
in an escape sequence to the terminal.
DomTerm handles a non-zero exit status by displaying a red circle
in the right gutter of the last line of the command.
(If there is no output, as with the false command,
the circle appears in the last input line.)
Hovering over the red circle displays the exit code.
Move cursor using mouse
People new to shells usually expect that they can move the input cursor using a mouse click, and are surprised when it doesn't work. Experienced shell users also sometimes want this ability, for example making an edit to a long command. This can be implemented using xterm-style mouse handling, but that is non-trivial to implement. It also has some undesirable side-effects, including disabling the default mouse behavior for selection and for context menus.
A simpler solution is to configure a terminal emulator to map a mouse click to the appropriate number of cursor-motion keystrokes. By default, the terminal can send the escape sequences emitted for the Left and Right arrow keys. This works well for many unmodified REPL applications. (However, to avoid surprises, this has to be specifically enabled by adding a special escape sequence to the prompt.)
DomTerm also allows you to force
mouse-click translation:
If the Alt modifier is pressed during a left mouse-click,
the DomTerm sends the appropriate arrow-key sequence to move the cursor,
even if translation has not been eplicitly requested.
This is useful for an application like vim,
which understands arrow keys but does not have mouse handling by default.
Motion is easy to handle when moving within a single line.
Some input editors (such as fish_ support multi-line input areas.
Things get more complicated when the mouse-click is a different line
than the current position. When the terminal calculates the arrow-key
sequence it must be able to
ignore prompts and non-significant spacing, such as the indentation
fish emits, or the space before any right-edge prompt.
Another issue is what kind cursor motion the terminal should send:
For fish you only want to send Left/Right arrows,
since Up/Down moves through the history.
The draft protocol and the DomTerm implementation support multiple options.
Integrating the selection and clipboard
How to integrate the system selection and clipboard with the input editor raises a number of questions that deserve a separate article. The way Emacs integrates the "region" with the selection seems a good approach (but the devil is in the details).
In DomTerm, if you make a selection that ends inside the input area, then DomTerm moves the cursor to the end of the selection (in the same way as if you clicked):

If you type Shift-Right or Shift-Left (optionally with Ctrl) the selection is extended and the cursor moved to the new endpoint. For example, typing Ctrl-Shift-Right extends the selection by one word:

Typing Ctrl-Shift-X copies the selection to the clipboard, and deletes it by emulating the appropriate number of Delete or Backspace key-presses.
Coming soon is having Delete or Backspace delete the selection, without copying to the clipboard.
Re-flow on window re-size
Many terminals will automatically re-flow (re-break) wrapped lines when the window width is changed. The terminal will also send a notification to the application, which may also re-display the output to take into account the changed size. The re-display done by the terminal may be conflict with that done by the application. For fullscreen applications it's not a problem because the applications can clear the buffer and re-paint, which clear any conflicting re-flow done by the terminal. For shells it is trickier: Suppose the current input fits on one line, but the window is made narrower. The terminal re-wraps the line as two lines. Then the application gets the window-changed notification, and redisplays the input line - but without taking into account the terminal's re-wrap, making a mess of the display.
This is a hard problem: Having the application assume re-wrap has happened is unreliable, because another re-size and re-wrap may have happened in the meanwhile. It is better to disable terminal re-wrap for the current line (the one containing the cursor), but that breaks in the case of multi-line input if the application re-sends previous input lines.
The proposed specification recommends that on re-size the application re-sends a prompt-start escape sequence, but not the command-start escape sequence. The terminal can if needed move the cursor to the first input line when it sees the prompt-start sequence. This seems to work pretty well.
(Better would be to let the terminal can handle the re-wrap, and the application not do re-display at all. This avoids the race condition, and it makes old input lines wrap the same way as the current line. However, that may require more radical protocol changes: It works best if the application can act as if the available width is unlimited, and delegate line-breaking it to the terminals.)
Select only real user input
When selecting and copying text that includes input it is usually more useful to ignore indentation, prompts, and extra spacing (such as between user input and a right prompt).
Right and continution prompts
Some shells and input libraries (including fish and JLine3) let the
application specify a right prompt
displayed at the right of the line.
This may complicate selection/copy, as you may not want to include
the right prompt (especially in the middle of multi-line input),
nor do you want selection to include the spacing before the prompt.
Ideally, reflow after width change should adjust the spacing so the
prompt of old input lines stays at the right. (This is not yet implemented.)
Fish will only display the right prompt if there enough space;
ideally this should be taken account on reflow.
Using web technologies for the GUI of a desktop application makes a lot of sense: they're portable, familiar, and powerful. A popular option is to use a comprehensive framework such as Electron. However, you might want the option of using a regular desktop browser — maybe you want to be able to access your application remotely, or you might prefer a lighter-weight embedded browser such as webview.
For a native-looking application you probably want menus: a top menubar as well as a pop-up (context) menu. While the various embedded platforms (such as Electron) each have their own APIs for menus, there is no standard JavaScript API. The DomTerm terminal emulator can be run with a small Electron wrapper (in which case it uses Electron menus), but it can also run in a plain browser like Firefox or Chrome. So I looked around for a lightweight menu library that would work in a desktop browser, but I didn't find anything I liked: They were unmaintained, or too big, or depended on some other library (such as jQuery), or were incomplete (popup menus but no menubar support, or missing keyboard navigation), or had an API too different from Electron's relatively simple one.
I finally found Sam Wray's nwjs-menu-browser, which satisfied most of
the goals.
It was strandalone, modest size, handled menubars as well
as popups, and had an API similar to NW.js (which is similar to that of Electron).
However, it had some issues. Missing features included keyboard navigation,
inability to share
menu-items between menus,
and some smaller problems.
I also found the build process too complicated for me.
The jsMenus library is a much-changed fork of nwjs-menu-browser. The functionality (and API) are very similar to that of Electron. In fact DomTerm uses much of the same JavaScript to construct menus whether using Electron or jsMenus. To see most of the features in action, check this live demo. It should be easy to figure out how it works from the demo.html source. You can also read the API documentation.
Finally, here is screenshot of jsMenus in action. This is DomTerm,
using the Chrome browser.
Chrome was started with the --app command-line option,
which (among other things) disables the default menubar and location bar.
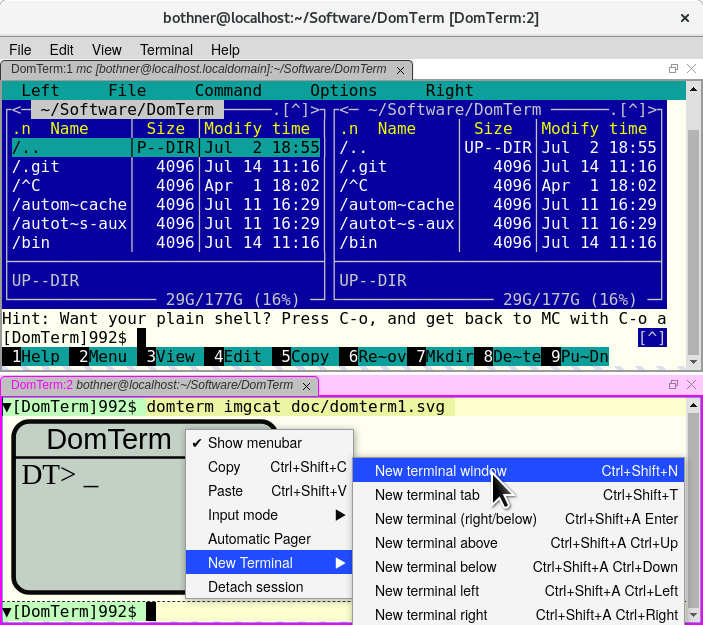
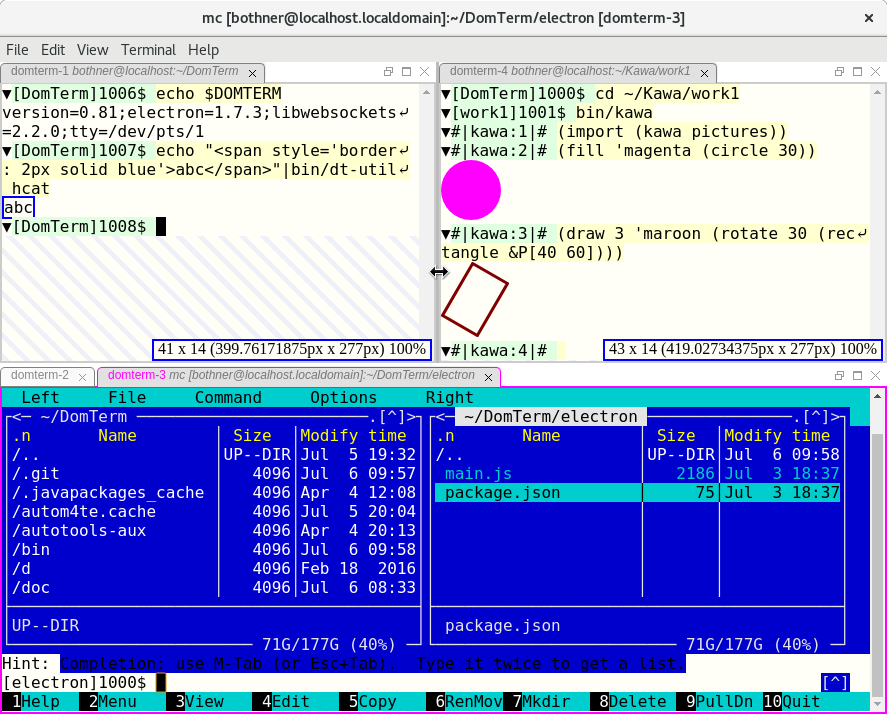
The DomTerm terminal emulator now supports sub-windows (panes) and tabs. These are resizable and draggable. This is implemented using the GoldenLayout JavaScript library.
The screenshot below shows 3 sub-windows.
The lower one has two tabs, domterm-2 and domterm-3.
The latter has focus (indicated by the magenta border),
and is running the mc file manager.
The upper left pane (domterm-1) shows how to embed html from the shell.
The domterm-4 pane shows using Kawa to
create composable picture values
which are displayed using embedded SVG.
You can resize panes by dragging the separator between them, and you can re-arrange panes or tabs by dragging a title bar. The screenshot shows as we are dragging the splitter between the two upper panes; the blue rectangles temporarily display the resulting sizes.
Compared to GNU screen or tmux, DomTerm supports more flexible layouts and easier manipulation using either mouse or keyboard. However, DomTerm does not yet support sessions that can be detached or accessed by multiple users at once, though I do hope to add it. Until then, I suggest using abduco or dtach to handle session management.
[ 2 * x | x <- [2,3,5,7,11]]The part after the
|is the scan specifier
x <- [2,3,5,7,11], where the scan variable
x ranges over the
elements of the scan sequence [2,3,5,7,11].
The result expression 2 * x is
evaluated for each element of the resulting sequence,
using the scan variables from the scan specifier(s).
Kawa's new (and experimental) List Comprehension Patterns
separate these two parts by making the scan specifier part of
the more general pattern-matching feature.
The result expression can be widely separated from the scan specifier,
as long is it within the lexical scope of any scan variable it uses.
For example they can be in separate REPL commands
(the #|kawa:N# is the REPL prompt).
First, some simple variable definions, using the Kawa-specific
(which is like !define extended to patterns):
#|kawa:1|# (! A [2 3 5 7 11])
#|kawa:2|# (! [A0 A1 A2 A3 A4] A)
The first line binds the variable
A to the result
of evaluating the sequence literal
[2 3 5 7 11].
The second illustrates matching
the pattern [A0 A1 A2 A3 A4] against
the value of A, which causes A0...A4
to be matched against corresponding elements of A:
#|kawa:3|# (+ A1 A4)
14
Finally, here is a list comprehension (or scan) pattern:
#|kawa:4|# (! [a ...] A)This declares
a to be a scan variable
that ranges over the elements of the scan sequence A.
You can only use a scan variable inside a scan context:
#|kawa:5|# a
/dev/stdin:2:1: using scan variable a while not in scan context
A
scan contextis an expression that is followed by ellipsis. The expression is evaluated once for each value of the corresponding scan variable(s), and the result sequence is
splicedinto its context. Here the scan context is the expression
(* 2 a),
which doubles the corresponding element a:
#|kawa:6|# [(* 2 a) ...]
[4 6 10 14 22]
This use of ellipsis is inspired by the syntax-rules
macro transformers of Scheme.
A scan variable can be used multiple times in the same scan context (ellipsis expression):
#|kawa:7|# [a ... a ...]
[2 3 5 7 11 2 3 5 7 11]
#|kawa:8|# [(* a a) ...]
[4 9 25 49 121]
Ellipses expressions are useful not just in sequence literals, but in the argument list of a procedure call, where the resulting sequence is spliced into the argument list. This is especially useful for functions that take a variable number of arguments, because that enables a convenient way to do fold/accumulate/reduce operations. For example:
#|kawa:9|# (+ a ...)
28
because 28 is the result of
(+ 2 3 5 7 11).
An elegant way to implement dot product:
(define (dot-product [x ...] [y ...])
  (+ (* x y) ...))
When an ellipse expression references two or more distinct scan variables then they are scanned
in parallel. That does not (necessarily) imply muliple threads, but that the first element of the scan result is evaluated using the first element of all the scan sequences, the second element of the result uses the second element of all the scan sequences, and so on.
Sub-patterns in ellipsis patterns
The form before ... in a pattern is itself a (sub-)pattern.
For example, the sub-pattern may include a type specifier,
which applies to each element:
#|kawa:11|# (define (isum [x::integer ...]) (+ x ...))
#|kawa:12|# (isum [4 5 6])
15
#|kawa:12|# (isum [4 5.1 6])
Argument #1 (null) to 'isum' has wrong type
	at gnu.mapping.CallContext.matchError(CallContext.java:189)
	at atInteractiveLevel-6.isum$check(stdin:11)
	...
(The stack trace line number
stdin:11 is that of
the isum definition.)
You can nest ellipsis patterns, allowing matching against sequences whose elements are sequences.
#|kawa:31|# (define (fun2 [[x ...] ...] [y ...])
#|.....32|#   [[(+ x y) ...] ...])
#|kawa:33|# (fun2 [[1 2 3] [10 11 12]] [100 200])
[[101 102 103] [210 211 212]]
Note that x is double-nested, while y is singly-nested.
The following does not work at time of writing, but will soon:
(! [[x y] ...] sequence-of-pairs) ;;Not yet working
Filtering the scan sequence
Often you only want to use some of the elements from the scan sequence.
For example SQL's select has a where with a
boolean expression; only elements for which the expession is true are included.
With scan patterns we have the option to filter the values either where the
scan variables are introduced (the pattern), or when they are used.
(The examples in this section are not working - and the design is undecided.)
Kawa has a splice operator @expr
that takes a sequence and spreads it out to multiple arguuments.
(It is similar to JavaScripts's spread syntax ...expr.)
It is useful to allow splice operators in scan expressions,
and even more useful to allow them in one or more branches of an if.
The following expressions selects the odd elements from a,
doubling them, but drops even elements.
It does the latter by returning a 0-length splice for each even element:
[(if (odd? a) (* 2 a) @[]) ...]
Some reasonable syntatic sugar would be to allow leaving out
the else
expression of an if, having it default
to a zero-length splice:
[(if (odd? a) (* 2 a)) ...]
APL has an expand
operator that repeats elements of an array
based on another count array.
This functionality can be achived using splices in scan expressions.
For example, the following repeats each odd element, and skips even elements:
[(if (odd? a) @[a a] @[]) ...]Equivalently (parsing issues aside):
[@(if (odd? a) [a a] []) ...]
It is also useful to filter at the pattern level.
The following hypothetical syntax would create a scan variable a
from those elements of the scan sequence A that
satisfy the boolean expression (P a).
(! [a ...] A #!if (P a)) ;; hypotheticalNote the sequence of
a values used to evaluate (P a)
would be different than the values in scan expressions.
That might be an issue.
Outer product
Instead of processing multiple sequences in parallel,
sometimes you want the multiplicative
combination of elements
from all the sequences.
This is called Cartesian product (or outer product in APL),
or an cross join in database query languages.
This could be handled with a (not implemented) outer-product function:
(outer-product [10 20] [1 2 3]) ⇒
  [[10 1] [10 2] [10 3] [20 1] [20 2] [20 3] [30 1] [30 2] [30 3]]
We could use it like this:
(! [[x y] ...) (outer-product X Y))
The above syntax is a bit awkward. Some syntatic sugar would help. If so, it should include an option for filtering only the desired combinations based on a boolean expression.
Comprehension as looping
Scan expression can form the basis of a looping framework
in a programming language.
Assume a function ignore that
ignores its arguments.
Then this is one way to write a
loop,
using its scan expression for its side effects:
for
(let (([i ...] [0 <: 10]))
  (ignore (do-something-with i) ...))
The scan valuable
i range of the
range expression
[0 <: 10].
The scan expression (do-something-with i) is evaluated
for each i.
A general looping construct needs a way to exit the loop
based on a condition, as in a while loop.
Than can be done by having a scan expression return
a special #!done value.
This assumes the scan elements are evaluated sequentially, which is a reasonable default. It would be useful to have some way to request that evaluation be done in parallel. This could be implemented by translating the code to use Java 8 streams, though for performance reasons we only want to do that when parallel execution is wanted.
Implementation notes
A scan variable is implemented as either a java.util.List or a (Java) array.
Using an array may be more efficient, partly because it easier to avoid boxing;
on the other hand it may require more copying..
Scan patterns are expanded by the compiler to a loop which initializes
the array. Scan expressions expand to map calls,
which are generally inlined to loops.
Numerous optimizations and performance improvements are possible.
The DomTerm terminal emulator has a number of unique features. In this article we will explore how it enables dynamic re-flow for Lisp-style pretty-printing.
The goal of pretty-printing is to split a text into lines with appropriate indentation, in a way that conforms to the logical structure of the text.
For example if we need to print the following list:
((alpha-1 alpha-2 alpha-3) (beta-1 beta-2 beta-3 beta-4))in a window 40 characters wide, we want:
((alpha-1 alpha-2 alpha-3) (beta-1 beta-2 beta-3 beta-4))but not:
((alpha-1 alpha-2 alpha-3) (beta-1 beta-2 beta-3 beta-4))
Pretty-printing is common in Lisp environments to display complicated nested data structures. Traditionally, it is done by the programming-language runtime, based on a given line width. However, the line width of a console can change if the user resizes the window or changes font size. In that case, previously-emitted pretty-printed lines will quickly become ugly: If the line-width decreases, the breaks will be all wrong and the text hard to read; if the line-width increases we may be using more lines than necessary.
Modern terminal emulators do dumb
line-breaking: Splitting a long
lines into screen lines, but regardless of structure or even word boundaries.
Some emulators remember for each line whether an overflow happened, or
whether a hard
newline was printed.
Some terminal emulators (for example Gnome Terminal) will use this
to re-do the splitting when a window is re-sized.
However, that does not help with pretty-printer output.
Until now.
Below is a screenshot from Kawa running in DomTerm at 80 colutions.
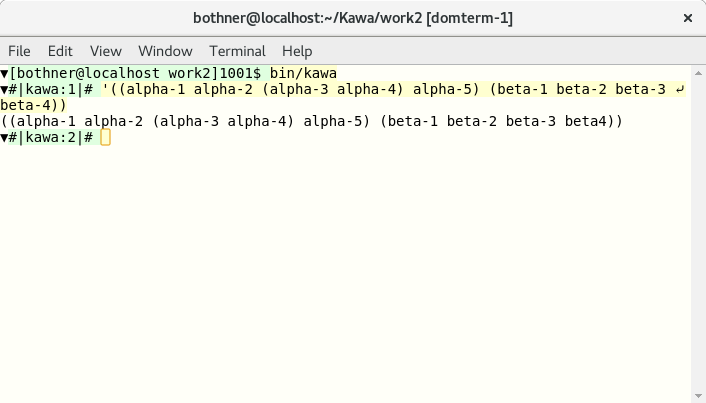
We reduce the window size to 50 columns.
The user input (yellow background) is raw text, so its line is split non-pretty
,
but the output (white background) gets pretty
re-splitting.
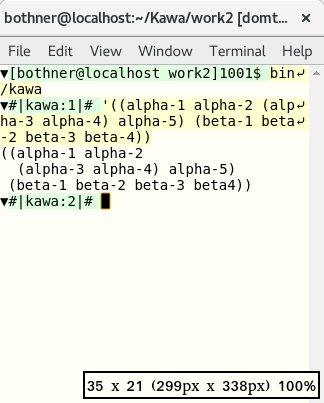
(Note the window size indicator in the lower-right.)

We reduce the window size to 35 columns:
It also works with saved pages
DomTerm allows you to save the current session as
a static HTML page.
If the needed DomTerm CSS and JavaScript files are provided
in the hlib directory, then dynamic line-breaking
happens even for saved log
files.
(The lazy way is to create hlib as a symbolic link
to the hlib directory of the DomTerm distribution.)
Try it yourself on a saved session.
The --debug-print-expr flag causes Kawa to print out each command
before it is compiled and evaluated. The result (shown in red because it
is sent to the standard error stream) is pretty-printed dynamically.
Structured text
This is how it works.
When an application pretty-prints a structure, it calls
special output
procedures to mark which parts of the output logically belong
together (a logical block
),
and where line-breaks and indentation may be inserted.
In Kawa the default print formatting for lists and vectors automatically calls
these procedures when the output is a pretty-printing stream
.
The pretty-printing library calculates where to put line-breaks and indentation,
based on these commands and the specified line length.
However, when the output stream is a DomTerm terminal, Kawa's pretty-printing library does not actually calculate the line-breaks. Instead it encodes the above-mentioned procedure calls as special escape sequences that get sent to DomTerm.
When DomTerm receives these escape sequences, it builds a nested DOM structure that corresponds to the orginal procedure calls. DomTerm calculates how to layout that structure using a variant of the Common Lisp pretty-printing algorithm, inserting soft left-breaks and indentation as needed.
When DomTerm detects that its window has been re-sized or zoomed, it first removes old soft line-breaks and identation. It does re-runs the layout algorithm.
When a page is saved, the nested DOM structure is written out too. If the saved page is loaded in a browser, and the necessary JavaScript libraries are available, then the pretty-printing algorithm is run on the saved page, both on initial load, and whenever the window is re-sized.
Hyphenation and word-breaking
DomTerm supports general soft (optional) line breaks: You can specify separate texts (optionally with styling) for each of the following: The text used when the line is not broken at that point; the text to use before the line-break, when broken (commonly a hyphen); the text to use after the line-break (following indentation). One use for this words that change their spelling when hyphenated, as may happen in German. For example the wordbackenbecomes
bak-ken. You can handle this using
ckk-k
I have recently spent a lot of time on
DomTerm, which
is becoming a fairly decent terminal emulator.
Being based on HTML5 technologies lets you do many
interesting things, including embed graphics.
The new qtdomterm standalone terminal
emulator is especially nice;
alternatively, you can also use the domterm --browser
command to start a process that uses a window/tab in your default
desktop browser.
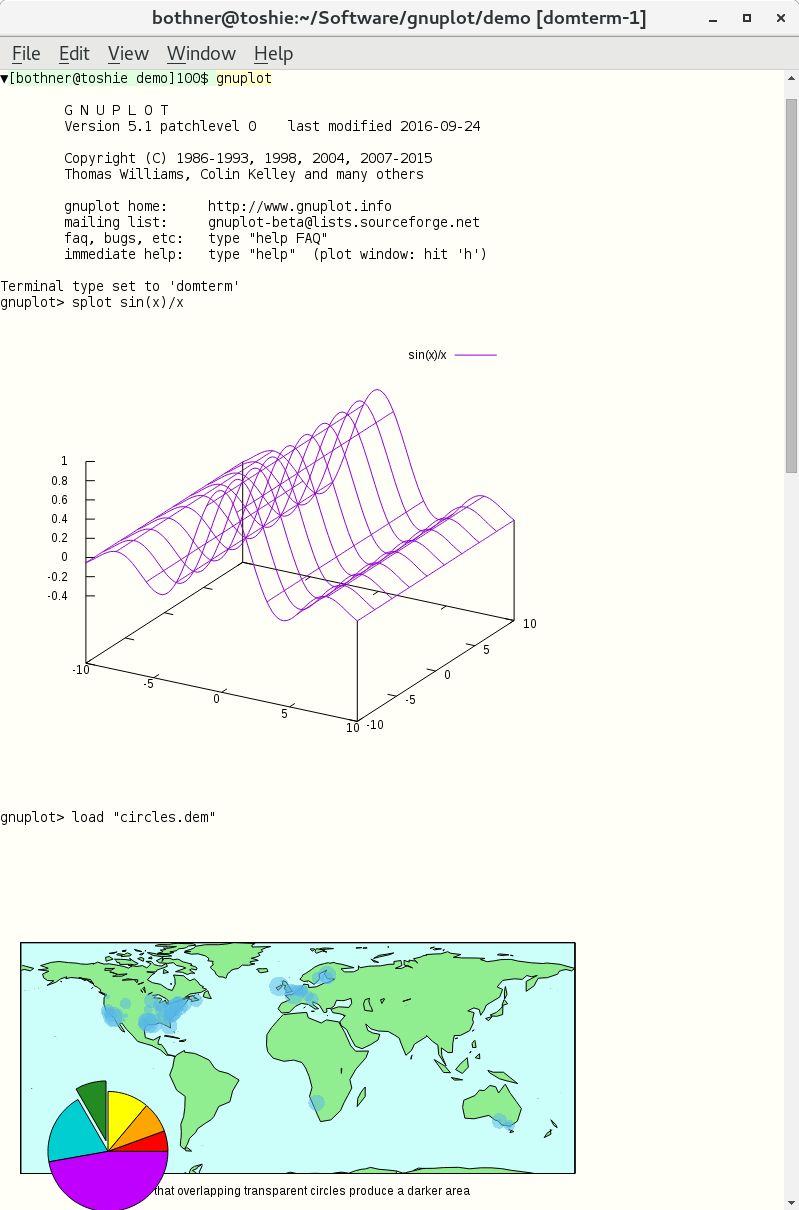
The gnuplot
package is a powerful graphing package.
It has a command-line that lets you specify complicated
functions and plots, and then give a plot command
to display the resulting plot. Unfortunately, it is difficult
to find a a good front-end that is usable for both command-line
interaction and graphics. People usually have to
specify output to either a file or an external viewer.
Would that one could insert the plots directly in the REPL output stream!
The development version of gnuplot (i.e. 5.1, available from CVS)
has native support for DomTerm.
It has domterm as a new terminal type, which you can select
explicitly (with the command set term domterm),
or use by default (since gnuplot
checks the DOMTERM environment variable,
which is set by DomTerm).
This works by using the pre-existing svg output driver
to generate SVG, but surrounding the SVG by escape sequences, and then printing
the result to standard output. DomTerm recognizes the escape sequence,
extracts the SVG (or more generally clean HTML) and inserts it
at the cursor
.
You can save the session output to an html file.
Here is an example.
In qtdomterm you can use the File / Save As menu item;
otherwise ctrl-shift-S should work.
This is a single html file, with embedded SVG;
images are embedded with a data: URL.
The file is actually XML (xhtml), to make it easier to process.
The saved file does need to css and js (JavaScript) files to be
readable, so you need to link or copy
the hlib directory in the DomTerm source distribution.
get the contents of a fileas a value, using a simple function, without using a port or looping. Kawa has a function to do that:
(path-data path)The path can be a
Path object,
or anything that can be converted to a Path, including
a filename string or a URL.
You can also use the following syntactic sugar, which is an example of SRFI-108 named quasi-literals:
&<{pname}
This syntax is meant to suggest the shell input redirection operator
<pname.
The meaning of &<{pname} is the same as
(path-data &{pname}),
where &{pname} is a
SRFI-109 string quasi-literal. (This is almost the same as (path-data "pname")
using a traditional string literal, except for the rules for quoting and escaping.)
What kind of object is returned by &<{pname}?
And what is printed when you type that at the REPL?
Fundamentally, in modern computers the contents of a file is
a sequence of uninterpreted bytes.
Most commonly, these bytes represent text in a locale-dependent encoding,
but we don't always know this. Sometimes they're images, or videos,
or word-processor documents. It's like writing assembly code:
you have to know the types of your values.
At best we can guess at the type of a file
based on its name or extension or looking for magic numbers.
So unless we have more information, we'll say that
path-data returns a
blob,
and we'll implementing it using the gnu.lists.Blob type.
$ cat README
Check doc directory.
$ kawa
#|kawa:1|# (define readme &<{README})
#|kawa:2|# readme:class
class gnu.lists.Blob
You can explicitly coerce a Blob to a string or to a bytevector:
#|kawa:3|# (write (->string readme))
"Check doc directory.\n"
#|kawa:4|# (write (->bytevector readme))
#u8(67 104 101 99 107 32 100 111 99 32 100 105 114 101 99 116 111 114 121 46 10)
#|kawa:5|# (->bytevector readme):class
class gnu.lists.U8Vector
The output of a command (which we'll discuss in the next article): is also a blob. For almost all programs, standard output is printable text, because if you try to run a program without re-direction, and it spews out binary data, it may mess up your terminal, which is annoying. Which suggests an answer to what happens when you get a blob result in the REPL: The REPL should try to print out the contents as text, converting the bytes of the blob to a string using a default encoding:
#|kawa:6|# &<{README}
Check doc directory.
It makes sense look at the bytes to see if we can infer an encoding,
especially on Windows which doesn't use a default encoding.
Currently Kawa checks for a
byte-order mark;
more sniffingis likely to be added later.
What if the file is not a text file?
It might be reasonable to be able to configure
a handler for binary files.
For example for a .jpg image file,
if the the console can display images, it makes sense to display
the image inline. It helps if the blob has a known MIME type.
(I believe a rich text console should be built using web browser technologies,
but that's a different topic.)
Writing to a file
The &<{..} operation can be used with set!
to replace the contents of a file:
(set! &<{README} "Check example.com\n")
If you dislike using
as an output operator,
you can instead using the <&>{..} operation,
which evaluates to function whose single argument is the new value:
(&>{README} "Check example.com\n")
You can use &>> to append more data to a file:
(&>>{README} "or check example2.com\n")
The current directory
Functions like path-data or open-input-file
or the sugar
we seen above all use the current directory
as a base directory for relative pathname. You get the
current value of the current directory with the expression
(current-path).
This returns a path object, which prints as the string value of the path.
The initial value of (current-path) is the
value of the "user.dir" property,
but you change it using a setter:
(set! (current-path) "/opt/myApp/")A string value is automatically converted to a
path,
normally a filepath.
The procedure current-path is a
parameter,
so you can alternatively call it with the new value:
(current-path "/opt/myApp/")You can also use the
parameterize form:
(parameterize ((current-path "/opt/myApp/"))
  (list &<{data1.txt} &<{data2.txt}))
Oracle's Java group uses the JIRA bug tracker. I've been experimenting with processing and filtering the XML backup file that JIRA can generate. The obvious choice seemed to be XSLT, and it worked pretty well on an evaluation instance of JIRA. Then I got a copy of our 1.5GB production instance. Ouch. XSLT works by building an in-memory DOM of the XML document and then matching templates. There is no chance that is going to work.
Next I tried Joost, an implementation of Streaming Transformations for XML (STX). This has the look of XSLT, but is designed to support one-pass streaming. This worked, but it took about 45 minutes on my laptop, which was discouraging, though better than nothing. (It's also worth noting that STX and Joost don't seem to be actively developed, perhaps because people are focusing on the streaming mode that XSLT 3.0 will have.)
Next I tried the StAX cursor classes that ship with Java 6. StAX is claimed to support fast XML processing. It took about 20 minutes. Better, but hardly fast.
Later (after the Kawa experiments discussed below), I tried an alternative StAX processor: The Aalto XML Processor took just under 1 minute for a full copy. This is pretty good. While not as fast as Kawa, Aalto is constrained by the StAX API, which isn't optimized for performance as well as Kawa's private APIs. This also doesn't seem to be actively maintained.
The Kawa source code includes a smattering of XML tools (including an implementation of XQuery 1.0). I wrote the XML parser with careful attention to performance. For example it avoids copying or needless object allocation. So I was curious how it would handle the 1.5GB JIRA dump. Needless to say - it didn't, at first. But I tracked down and fixed the bugs.
The result was quite gratifying: About 20 seconds for a full copy.
I then modified the application to skip Issue,
Action, Label, ChangeItem,
and CustomFieldValue elements, including their children.
That run took about 15 seconds, writing a 296MB output file.
This is the entire program:
import gnu.text.*;
import gnu.xml.*;
import gnu.lists.*;
import java.io.*;

public class KawaFilter extends FilterConsumer {
    int nesting = 0;
    int skipNesting = -1;

    public boolean skipElement(XName name) {
        String local = name.getLocalName();
        if (local=="Issue" || local=="Action" || local=="Label"
            || local=="ChangeItem" || local=="CustomFieldValue")
            return true;
        return false;
    }

    public KawaFilter(Consumer base) {
        super(base);
    }

    @Override
    public void startElement(Object type) {
        nesting++;
        if (! skipping && type instanceof XName
                && skipElement((XName) type)) {
            skipNesting = nesting;
            skipping = true;
        }
        super.startElement(type);
    }

    @Override
    public void endElement() {
        super.endElement();
        if (skipNesting == nesting) {
            skipping = false;
            skipNesting = -1;
        }
        nesting--;
    }

    public static void main(String[] args) throws Throwable {
        String inname = args[0];
        OutputStream outs = new FileOutputStream(args[1]);
        XMLPrinter xout = new XMLPrinter(outs);
        xout.setPrintXMLdecl(true);
        KawaFilter filter = new KawaFilter(xout);
        SourceMessages messages = new SourceMessages();
        xout.beginEntity(inname);
        XMLParser.parse(inname, messages, filter);
        xout.endEntity();
        messages.printAll(System.err, 20);
        xout.close();
    }
}
Most of this is boiler-plate (and should be abstracted out).
The only context-specific code is the skipElement
method, which is called when the start of an element is seen.
The method takes an element tag (QName), and returns true if
the element and it's children should be skipped.
The startElement and endElement
are called by the parser. They work by setting the protected
skipping field in the
FilterConsumer class.
One could easily modify KawaFilter to rename
elements or attributes, or to remove attributes.
Changing skipElement so it could base its decision
on the names of ancestor elements would also be easy.
More challenging would be to allow skipElement
to base its decision on the existance or values of attributes.
The reason is that startElement is called before
the attributes is called: This is for performance, so we don't
have to build a data structure for the attributes.
However, it would not be difficult to add an option to
remember the attributes, and defer the skipElement
call to the end of the element start-tag, rather than the beginning.
You run KawaFilter thus:
$ java java -cp .:kawa.jar KawaFilter input.xml output.xml
For kawa.jar you need to build
Kawa from the Subversion repository (until I make a binary release containing the fixed XML classes).
java.lang.Process and java.lang.ProcessBuilder.
However, they're not as convenient as
as the old Bourne shell, or as elegant in composing commands.
If we ignore syntax, the shell's basic model is that a command is a function that takes an input string (standard input) along with some string-valued command-line arguments, and whose primary result is a string (standard output). The command also has some secondary outputs (including standard error, and the exit code). However, the elegance comes from treating standard output as a string that can be passed to another command, or used in other contexts that require a string (e.g. command substitution). This article presents how Kawa solves this problem.
Process is auto-convertable to string
To run a command like date,
you can use the run-process procedure:
#|kawa:2|# (define p1 (run-process "date --utc"))Equivalently you can use the
&`{command}
syntactic sugar:
#|kawa:2|# (define p1 &`{date --utc})
But what kind of value is p1?
It's an instance of gnu.kawa.functions.LProcess,
which is a class that extends java.lang.Process.
You can see this if you invoke toString or call the
write procedure:
#|kawa:2|# (p1:toString)
gnu.kawa.functions.LProcess@377dca04
#|kawa:3|# (write p1)
gnu.kawa.functions.LProcess@377dca04
An LProcess is automatically converted to
a string or a bytevector in a context that requires it.
More precisely, an LProcess
can be converted to a blob
because it implements Lazy<Blob>.
This means you can convert to a string (or bytevector):
#|kawa:9|# (define s1 ::string p1)
#|kawa:10|# (write s1)
"Wed Jan  1 01:18:21 UTC 2014\n"
#|kawa:11|# (define b1 ::bytevector p1)
(write b1)
#u8(87 101 100 32 74 97 110 ... 52 10)
However the display procedure prints it in "human" form,
as a string:
#|kawa:4|# (display p1)
Wed Jan  1 01:18:21 UTC 2014
This is also the default REPL formatting:
#|kawa:5|# &`{date --utc}
Wed Jan  1 01:18:22 UTC 2014
Command arguments
The general form for run-process is:
(run-process keyword-argument... command)
The command is the process command-line. It can be an array of strings, in which case those are used as the command arguments directly:
(run-process ["ls" "-l"])The command can also be a single string, which is split (tokenized) into command arguments separated by whitespace. Quotation groups words together just like traditional shells:
(run-process "cmd a\"b 'c\"d k'l m\"n'o")
   ⇒ (run-process ["cmd"   "ab 'cd"   "k'l m\"no"])
Using string templates is more readable as it avoids having to quote quotation marks:
(run-process &{cmd a"b 'c"d k'l m"n'o})
You can also use the abbreviated form:
&`{cmd a"b 'c"d k'l m"n'o}
This syntax is the same as
of SRFI-108 named quasi-literals.
In general, the following are roughly equivalent
(the difference is that the former does smart quoting of embedded expressions,
as discussed later):
&`{command}
(run-command &{command})
Similarly, the following are also roughly equivalent:
&`[keyword-argument...]{command}
(run-command keyword-argument... &{command})
A keyword-argument can specify various properties of the process. For example you can specify the working directory of the process:
(run-process directory: "/tmp" "ls -l")You can use the
shell keyword to
specify that we want to use the shell to
split the string into arguments.
For example:
(run-process shell: #t "command line")is equivalent to:
(run-process ["/bin/sh" "-c" "command line"])You can can also use the abbreviation
&sh:
&sh{rm *.class}
which is equivalent to:
&`{/bin/sh -c "rm *.class"}
In general, the abbreviated syntax:
&sh[args...]{command}
is equivalent to:
&`[shell: #t args...]{command}
Command and variable substitution
Traditional shells allow you to insert the output from a command into the command arguments of another command. For example:echo The directory is: `pwd`The equivalent Kawa syntax is:
&`{echo The directory is: &`{pwd}}
This is just a special case of substituting the result from evaluating an expression. The above is a short-hand for:
&`{echo The directory is: &[&`{pwd}]}
In general, the syntax:
...&[expression]...evaluates the
expression,
converts the result to a string, and combines it with the literal string.
(We'll see the details in the next section.)
This general form subsumes command substitution,
variable substitution, and arithmetic expansion.
Tokenization of substitution result
Things gets more interesting when considering the interaction between substitution and tokenization. This is not simple string interpolation. For example, if an interpolated value contains a quote character, we want to treat it as a literal quote, rather than a token delimiter. This matches the behavior of traditional shells. There are multiple cases, depending on whether the interpolation result is a string or a vector/list, and depending on whether the interpolation is inside a quotes.
- If the value is a string, and we're not inside
quotes, then all non-whitespace characters (including quotes) are literal,
but whitespace still separates tokens:
(define v1 "a b'c ") &`{cmd x y&[v1]z} ⟾ (run-process ["cmd" "x" "ya" "b'c" "z"]) - If the value is a string, and we are inside
single quotes, all characters (including whitespace) are literal.
&`{cmd 'x y&[v1]z'} ⟾ (run-process ["cmd" "x ya b'c z"])Double quotes work the same except that newline is an argument separator. This is useful when you have one filename per line, and the filenames may contain spaces, as in the output from
find:&`{ls -l "&`{find . -name '*.pdf'}"}If the string ends with one or more newlines, those are ignored. This rule (which also applies in the previous not-inside-quotes case) matches traditional shell behavior.
- If the value is a vector or list (of strings), and we're
not inside quotes, then each element of the array becomes its own argument,
as-is:
(define v2 ["a b" "c\"d"])
&`{cmd &[v2]}  ⟾  (run-process ["cmd" "a b" "c\"d"])
However, if the enclosed expression is adjacent to non-space non-quote characters, those are prepended to the first element, or appended to the last element, respectively.&`{cmd x&[v2]y} ⟾ (run-process ["cmd" "xa b" "c\"dy"]) &`{cmd x&[[]]y} ⟾ (run-process ["cmd" "xy"])This behavior is similar to how shells handle"$@"(or"${name[@]}"for general arrays), though in Kawa you would leave off the quotes.Note the equivalence:
&`{&[array]} ⟾ (run-process array) -
If the value is a vector or list (of strings), and
we are inside quotes, it is equivalent to interpolating
a single string resulting from concatenating the elements
separated by a space:
&`{cmd "&[v2]"} ⟾ (run-process ["cmd" "a b c\"d"])This behavior is similar to how shells handle
"$*"(or"${name[*]}"for general arrays). -
If the value is the result of a call to
unescaped-datathen it is parsed as if it were literal. For example a quote in the unescaped data may match a quote in the literal:(define vu (unescaped-data "b ' c d '")) &`{cmd 'a &[vu]z'} ⟾ (run-process ["cmd" "a b " "c" "d" "z"]) -
If we're using a shell to tokenize the command,
then we add quotes or backslashes as needed so that
the shell will tokenize as described above:
&sh{cmd x y&[v1]z} ⟾ (run-process ["/bin/sh" "-c" "cmd x y'a' 'b'\\'''c' z'"])
&`{command}.
You can of course use string templates with run-process:
(run-process &{echo The directory is: &`{pwd}})
However, in that case there is no smart tokenization: The template
is evaluated to a string, and then the resulting string is tokenized,
with no knowledge of where expressions were substituted.
Input/output redirection
You can use various keyword arguments to
specify standard input, output, and error streams. For example
to lower-case the text in in.txt, writing
the result to out.txt, you can do:
&`[in-from: "in.txt" out-to: "out.txt"]{tr A-Z a-z}
or:
(run-process in-from: "in.txt" out-to: "out.txt" "tr A-Z a-z")
These options are supported:
in: value- The
valueis evaluated, converted to a string (as if usingdisplay), and copied to the input file of the process. The following are equivalent:&`[in: "text\n"]{command} &`[in: &`{echo "text"}]{command}You can pipe the output from
command1to the input ofcommand2as follows:&`[in: &`{command1}]{command2} in-from:path- The process reads its input from the specified path,
which can be any value coercible to a
filepath. out-to:path- The process writes its output to the specified path.
err-to:path- Similarly for the error stream.
out-append-to:patherr-append-to:path-
Similar to
out-toanderr-to, but append to the file specified by path, instead of replacing it. in-from: 'pipeout-to: 'pipeerr-to: 'pipe- Does not set up redirection.
Instead, the specified stream is available using the methods
getOutputStream,getInputStream, orgetErrorStream, respectively, on the resultingProcessobject, just like Java'sProcessBuilder.Redirect.PIPE. in-from: 'inheritout-to: 'inheriterr-to: 'inherit- Inherits the standard input, output, or error stream from the current JVM process.
out-to: porterr-to: port- Redirects the standard output or error of the process
to the specified
port. out-to: 'currenterr-to: 'current- Same as
out-to: (current-output-port), orerr-to: (current-error-port), respectively. in-from: portin-from: 'current- Re-directs standard input to read from the
port (or
(current-input-port)). It is unspecified how much is read from the port. (The implementation is to use a thread that reads from the port, and sends it to the process, so it might read to the end of the port, even if the process doesn't read it all.) err-to: 'out- Redirect the standard error of the process to be merged with the standard output.
The default for the error stream (if neither err-to
or err-append-to is specifier) is equivalent
to err-to: 'current.
Note:
Writing to a port is implemented by copying
the output or error stream of the process.
This is done in a thread, which means we don't have any
guarantees when the copying is finished.
A possible approach is to have to process-exit-wait
(discussed later) wait for not only the process to
finish, but also for these helper threads to finish.
Here
documents
A here document
is a form a literal string, typically multi-line, and
commonly used in shells for the standard input of a process.
Kawa's string literals or string quasi-literals can be used for this.
For example, this passes the string "line1\nline2\nline3\n"
to the standard input of command:
(run-process [in: &{
    &|line1
    &|line2
    &|line3
    }] "command")
The &{...} delimits a string;
the &| indicates the preceding indentation is ignored.
Pipe-lines
Writing a multi-stage pipe-line quickly gets ugly:
&`[in: &`[in: "My text\n"]{tr a-z A-Z}]{wc}
Aside: This would be nicer in a language with in-fix operators, assuming&`is treated as a left-associative infix operator, with the input as the operational left operand:"My text\n" &`{tr a-z A-Z} &`{wc}
The convenience macro pipe-process makes this much nicer:
(pipe-process
  "My text\n"
  &`{tr a-z A-Z}
  &`{wc})
All but the first sub-expressions must be (optionally-sugared)
run-process forms.
The first sub-expression is an arbitrary expression
which becomes the input to the second process expression;
which becomes the input to the third process expression;
and so on. The result of the pipe-process
call is the result of the last sub-expression.
Copying the output of one process to the input of the next is optimized: it uses a copying loop in a separate thread. Thus you can safely pipe long-running processes that produce huge output. This isn't quite as efficient as using an operating system pipe, but is portable and works pretty well.
Setting the process environment
By default the new process inherits the system environment of the current (JVM) process as returned bySystem.getenv(),
but you can override it.
env-name: value-
In the process environment, set the
"name"to the specifiedvalue. For example:&`[env-CLASSPATH: ".:classes"]{java MyClass} NAME: value-
Same as using the
env-nameoption, but only if theNAMEis uppercase (i.e. if uppercasingNAMEyields the same string). For example the previous example could be written:(run-process CLASSPATH: ".:classes" "java MyClass")
environment: env-
The
envis evaluated and must yield aHashMap. This map is used as the system environment of the process.
Process-based control flow
Traditional shell provides logic control flow operations based on the exit code of a process: 0 is success (true), while non-zero is failure (false). Thus you might see:
if grep Version Makefile >/dev/null
then echo found Version
else echo no Version
fi
One idea to have a process be auto-convertible to a boolean,
in addition to be auto-convertible to strings or bytevectors:
In a boolean context, we'd wait for the process to finish,
and return #t if the exit code is 0,
and #f otherwise. This idea may be worth exploring later.
Currently Kawa provides process-exit-wait
which waits for a process to exit, and then returns the
exit code as an int.
The convenience function process-exit-ok?
returns true iff process-exit-wait returns 0.
(process-exit-wait (run-process "echo foo")) ⟾ 0The previous
sh example could be written:
(if (process-exit-ok? &`{grep Version Makefile})
  &`{echo found}
  &`{echo not found})
Note that unlike the sh, this ignores the
output from the grep (because no-one has asked for it).
To match the output from the shell, you can use out-to: 'inherit:
(if (process-exit-ok? &`[out-to: 'inherit]{grep Version Makefile})
  &`{echo found}
  &`{echo not found})